GISRSStudy » Learn Software » ArcGIS Tutorial

ArcGIS Tutorial

ArcGIS Developed by ESRI. It is use to the Mapping and Analytics Platform.

ArcGIS was first released in 1999 and originally was released as ArcINFO, later it’s merge into ArcGIS Desktop.

The traditional ArcGIS Desktop applications are:

Other ArcGIS applications are:

Download ArcGIS

ArcGIS Released Version: 10.8 (February 2020). Download and follow ArcGIS Tutorial in below.

ArcGIS Tutorial for Beginners

ArcGIS Provides GIS and Mapping Products.
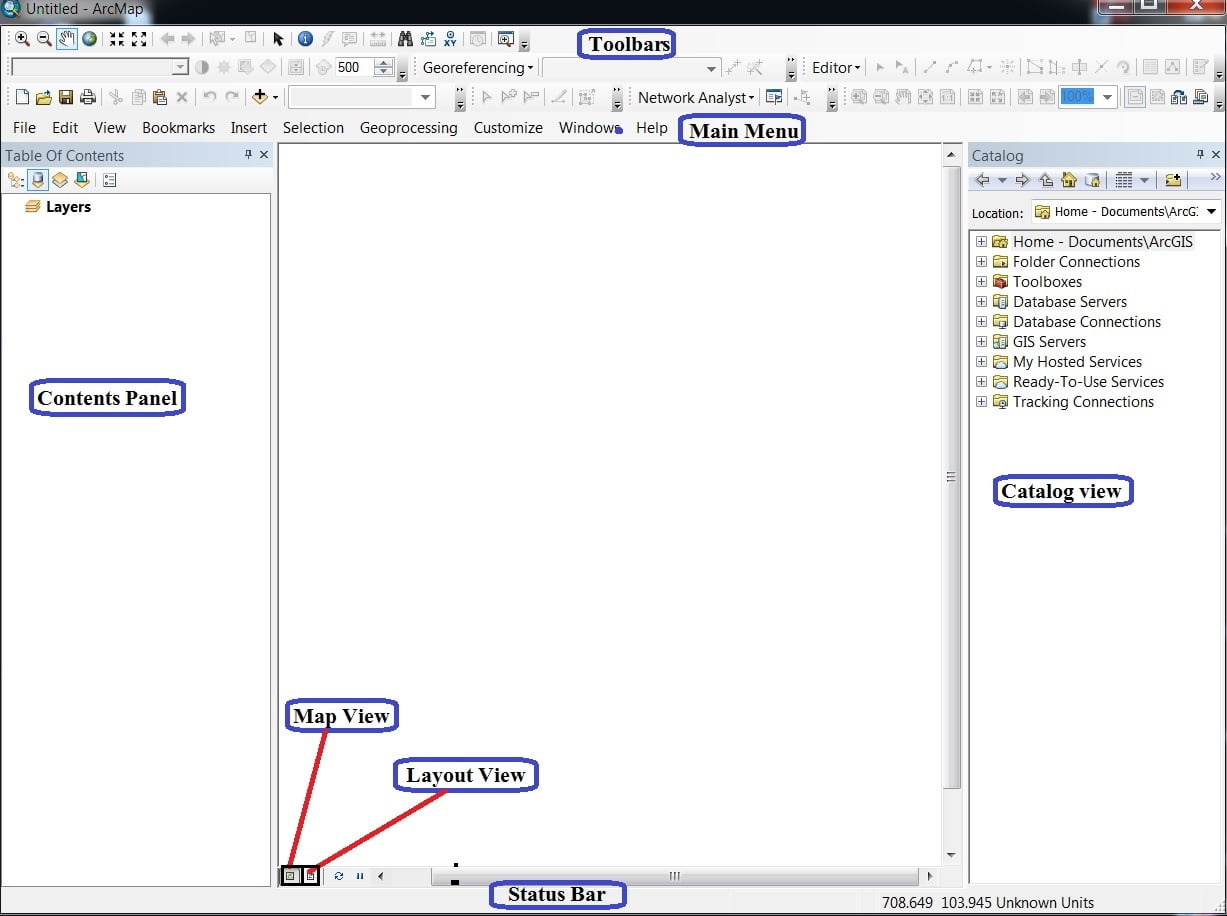
Open ArcMap Application and Connect to required folder:

1. Open ArcMap application, a new untitled map open > Click Catalog tool from the standard toolbar. Now see the Catalog window opens on the right side.

ArcGIS application includes a Catalog window that is used to organize and manage various types of geographic information as logical collections, for example- data, maps. The results of your current GIS project that you work within ArcGIS.

2. Navigate to the Folder Connections node > Right-click and choose Connect To Folder > choose your Folder and OK.

Once you have established a folder connection, you can use the Catalog window to navigate the folder, show your data or map.

3. Add data to ArcMap by dragging datasets into the data frame (Right-click an item and select Item Description to view and edit its metadata).

Perform Image to Image Georeferencing

In this Tutorial Learn, Howto create Image to Image Georeferencing using ArcGIS Software. Following the steps below:

Steps:

1. First add to Basemap. Dropdown ‘+’ button and add a Basemap, choose Topographic.

2. In the catalog window expand the Folder (ArcGIS) that contains open Unreferenced images, just drag it.

3. When you try to add any GIS data that missing spatial reference information in the ArcMap, it will warn you. Click the OK button to close this warning message.

4. To display individual images on the map. Select any one image from the Table of Content (TOC) window, click the right-button of the mouse and choose Zoom To Layer option.

5. Do not display the Georeferencing toolbar, click the Customize menu and click Toolbars > Georeferencing, From the Georeferencing toolbar.

Click the Layer drop-down arrow and click the Unreferenced Raster layer that you want to Georeference.

6. Minimum 4 points are required to perform this task. You can also collect maximum points to better accuracy to Georeferencing.

Select Add point-click any particular place in an Unrectified image (Los Angeles.jpg), then zoom to layer Base map and zoom in its same place and click it.

7. The same process follows to complete 4 points or many. You will show an unrectified image automatically adjust the same area in the Base map. Just check it table to collect all points, open view link table.

Now finally rectify the unrectified image.

8. Drop-down arrow Georeferencing button, select Rectify, rectify window is open, now select output Location you can change the name and file format, then click Save.

Discard the Unrectified image.

9. Already open a Basemap, now open Rectified image, you can swipe (available effects layer) and check it accuracy label of this georeferenced image.

Perform Ground to Image Georeferencing

In this Tutorial Learn, How to create Ground to Image Georeferencing, using ArcGIS Software. Following the steps below:

Steps :

1. From the right side Catalog window, drag the unrectified image (sikkim_disrict.jpg) to the map.

When you add this image, ArcMap generates a warning window, Because ArcMap does not find any spatial referencing information for this image.

You just click the OK button and close this warning window.

2. Click the Add Control Points tool, click anyone cross point of this Unreferenced image to add the source coordinate of the 1st link.

3. Click the right button of the mouse and select Input X and Y option from the pop-up window. Coordinates dialog box appears, enter the Longitude (X) and Latitude (Y) value.

4. Click OK, follow the same technique and add additional three links for the other three cross points (you can also generate more points to better accuracy).

5. Click the View Link Table (i) to evaluate the transformation. Input any wrong point or value, choose select link (ii), select a point, and then press the delete button on your keyboard.

6. Select the Georeferencing drop-down menu and click Rectify. Save as window is appears, change the output location and also change name and file format, and click save.

7. Select the unreferenced image (sikkim_district) from the TOC (Table of Content) window and remove it. Now Save changes to the existing map window are open, click No button. Because now you don’t need to save this map.

8. Before adding the rectified image in the catalog window, select rectified image (Sikkim_district_rectify), click the right button to choose Properties.

9. Scroll down the Raster Dataset Properties window, on the Spatial Reference Section, click Edit button.

In the Spatial Reference Properties window, expand the Geographic Coordinate Systems folder. Then expand the World sub-folder and choose the WGS 1984 coordinate system and click OK button.

Change Projection (GCS to PCS)

1. Change the projection in a map, open Arc Toolbox (i). ArcToolbox window appears to expand Data management tools, then expend projection and Transformation sub-group, expend Raster, select project raster, and double click it.

You also use the short cart method open search window (ii), search project raster in the box, the result is an automatic show.

2. Project raster pane is open, select input raster, choose a folder to output dataset, then click the output coordinate system button.

Expand the Projected Coordinate Systems folder and choose the required coordinate system. Click OK and then press OK.

Open a new projected coordinate system image and check it.

Create Shapefile (Vector file) in ArcGIS

Shapefiles are simple, non-topological vector format for storing the Geometric location and attribute information of geographic features.

A Shapefile is one of the spatial data formats that you can work with and edit in ArcGIS. Geographic features in a Shapefile can be represented by points, lines, or polygons.

1. From the right side, Catalog window select the folder, click the right button of the mouse, then New > Shapefile.

2. In the Create New Shapefile dialog box, write the name of the shapefile and choose Feature Type

On the Spatial Reference Section, click the Edit button and select Geographic Coordinate Systems (GCS)- WGS 1984. Finally, click the OK button to close the Create New Shapefile dialog box.

New Shapefile is automatically added in contents (TOC) pane.

Digitization (Raster 2 Vector Conversion)

Now perform Digitization process in ArcGIS, following the steps below:

Steps :

Add Editor toolbar- click Customize, select Toolbars, and click Editor.

Start an edit session by clicking Editor > Start Editing.

Snapping

Before Start digitizes, set up Snapping properties into 3 steps.

(i) By clicking Editor > select options> Editor options window appears> click use classic snapping, then apply and ok. 

(ii) Go to Editor > Snapping> Options. In the Snapping Options, the window set the snapping tolerance value 10 pixels (general between 7 to 10 pixels). 

(iii) Ones again drop-down Editor > Snapping> and select Snapping window. snapping environment window is open click on 3 boxes, Vertex, Edge, and End.

Create Feature

1. Go to Editor > select create Feature (i). Create Features window appears, choose a feature template and construction tool from the Create features Window.

2. Now select a straight segment (ii) and start Digitize.

3. One Boundary Digitize is complete, now second Boundary Digitize, two Boundaries common line is joined use to Trace tool. Select Trace, click two boundaries, join point, and trace it.

4. Anythings wrong when the digitization process, you can Edit this. Select Edit tool, click boundary line > Right click and choose Edit Vertices.

Attribute Table

Right-click to the vector layer (District_boundary), open Attribute table. The attribute table window appears now to create a new field.

1. Add Field- Drop-down Table options and select Add field (make sure editing is off otherwise added field option is disabled).

Add field window is open fill the Name, Field Type, and Field Properties then click OK.

2Join Data- Right-click Layer > Properties > Layer properties window appears, select joins and relates. Now click the Add a button on the left side to join the field.

Join the Data window is open, (i) choose the field, (ii) choose the table, and (iii) choose the field to table to base the join on. Remember (i) and (ii) the field is the same, otherwise it can’t be joined.

Click the validate join and then click OK.

Now check Data is joining or not. Ones again, open the Attribute table and show the join Data.

Labels

Right-click the Block Final layer in the TOC window, click Properties, or double-click the layer name to open the Layer Properties dialog box.

  1. Click the Labels tab.
  2. Click the Label features in this layer checkbox.
  3. In the Label Field drop-down box, choose the proper field (for example Block_No field).
  4. Choose a proper style for the label such as font type, size, color, etc.

Layout

Create Layout in ArcGIS. Following the steps below:

Steps:

1. The first step in ArcMap is to change your map view to layout — by selecting Layout View from the view menu.

2. Set your layout’s page size and Orientation.

3. In Layout view add Grids (coordinates value), Right-click layout view > properties > Data frame properties window appears, select new Grids.

Grids and Graticules are open, click next, and set all the properties.

4. Click the Insert menu to add elements to your layout. If you have more than one data frame in your map, the elements you insert will relate to the active data frame.

5. Finally, print or export the layout view as an image file. Go to File menu > Export Map.

Layout Map

Learn more ArcGIS Tutorials

Scroll to Top