ArcGIS Pro 3.4 (Latest Version)
In this release ArcGIS Pro development team, added a variety of new features focusing on innovation, as well as productivity and performance. This include creating a definition query from a feature selection, combo chats, improvements to search functionality, and many more.
What’s New in ArcGIS Pro 3.4?
ESRI has made some major changes to the start page in ArcGIS Pro 3.4. It is a refreshed start experience with more resource provided.

Create Definition Query from a Feature Selection
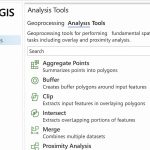
You can create a definition query from an active feature selection on any map or scene by using the generate definition query from selection tool. In this example a regional map shows current air quality conditions in South Asia. We want to filter the measurements to India. We will select all readings within its region. With an active selection on the feature layer, we open the new tool in the layer or table containing the active selection, make any other necessary parameter adjustments and click Run. When the map is refreshed the filter is applied. The query can be further modified by viewing the definition query tab in the layer properties dialogue window.
Control symbol class visibility for unique values symbology
Unique value symbology draws a different symbol for each class. You can now control the visibility of each class independently from the symbology pane or use the contents pane for multiple map layers. In the symbology pane, use the cheque boxes to control which classes are drawn on the map. Invisible classes still appear in the extended view of the layer in the contents pane. You can add visibility cheque boxes to the contents pane to control multiple unique value layers. You first enable a layer to show the cheque boxes from the more menu. The two sets of cheque boxes remain in sync. Symbol class visibility is matched by legends on a layout.
Set the time period for offline licence checkout
As an administrator you can set a custom limit to the amount of time users in your organisation can take arcgis pro licences offline. Go to the licences tab and click manage arcgis pro settings. In the dialogue that appears choose members can take arcgis pro-offline for a set period and change the value as needed. To commit your changes click save. Pro as a user you can take arcgis pro offline up to the maximum number of days your administrator allows which in this case is a month. If you need to take the licence offline for only a week you can change the number of days and then cheque the authorise arcgis pro to work offline checkbox. To return the licence you will need to sign back into the portal.
Share 3D Tiles to ArcGIS Enterprise
You can share 3D tiles layers within a scene as a web layer to ArcGIS enterprise 11.4 and later. You can also publish a web layer that directly references a 3D tiles data set in a folder or cloud storage location. The data location must be registered as a data store with the server. In ArcGIS Enterprise 3D tiles layers are visualised as integrated meshes or 3D objects. Integrated meshes 3D tiles web layers can be incorporated into web scenes providing dynamic 3D visualizations that support analysis and decision making.
Create Combo Charts
The new combo chart allows you to combine both bar and line series into a single visualisation and can also include a secondary Y axis which can be useful for comparing datasets with different scales. For example, you can display total precipitation as bars on the left Y axis and average temperature as a line on the right Y axis. This can see the flexibility to visualise and compare different types of data in a single chart.
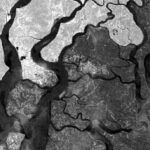
Work With Hyperspectral Imagery
ArcGIS pro now supports hyperspectral imagery which contains hundreds of bands. You can load hyperspectral data into a map by clicking the add data drop down arrow and selecting hyperspectral data. This opens a dialogue where you can select the image file which in this case is average satellite data with 425 bands and how you want to identify the bands in your data. The hyperspectral image is loaded into the map as a natural colour display. In the content pane you can assign any of the average bands to be displayed in the map. In this example you can see that the name ID and wavelength of each band is listed. You can apply any image processing or analysis tools to hyperspectral data. For example, you can create a mosaic data set and then analyse the mosaic data set with the spectral profile chart.
Search Enhancement
Starting in ArcGIS Pro 3.4 the semantic search engine included in geoprocessing search has been extended to the command search box. This enables command search to perform more robust queries of available tools and commands as well as gives you the capability of asking semantic type questions. For example, entering how do I view the attributes of a feature layer will provide you with relevant results. In addition, we’ve added a similar surge control to property pages like map properties and the options dialogue box, allowing you to search for specific settings quicker. For example, entering render into the option search box will show me all relevant pages that match that term with exact matches highlighted in the results. The property search enhancements are included for all installations of ArcGIS Pro 3.4. However semantic search needs to be enabled during installation.
Paste Individual Layer Properties
Enhancements have been made to the paste properties command to allow subsets of properties to be pasted such as symbology labelling charts and more. Let’s say I want to use the display philtre and symbology from this 2023 county health rankings feature layer on my 2020 layer so I can compare the two years of data. Manually set in these properties is possible but time consuming. Instead, we can copy the 2023 county layer and with the 2020-layer selected hover over the paste properties command and click display filters. The notification confirms that the properties were pasted successfully. We can follow the same steps to copy and paste symbology properties or any other property group. You can also copy and paste certain properties subsets between standalone tables subtype layers and subtype tables.
Minimize Floating View
Starting in ArcGIS Pro 3.4 views like maps scenes and attribute tables can now be minimised to the Windows Task Bar. To accomplish this, float the view either by dragging it out of the area it is docked in or by right clicking the view tab and selecting float. Now you can minimise the views like you would any other application window recovering screen space without needing to close them. Likewise, you may reposition these views back into the main pro window at any point. Those were the top items for Arcgis Pro 3.4. For a full list of everything new in this release please read the what’s new documentation for ArcGIS Pro.
Why Release ArcGIS Pro 3.4?
The 3 primary reasons for moving to a Pro 3.4 release are:
- Make functional, performance, and quality improvements not possible without breaking changes.
- Update to .NET 8, Microsoft’s latest version with Long Term Support.
- Refactor the Pro APIs for improved consistency, quality and ease of use.