ArcGIS Animation Tutorial
What is Animation?
An animation is a visualization of the changes to the properties of one object or a set of objects. They can help you visualize changes in perspective, changes in the document’s properties, and geographic movements. Use animations to understand patterns in data through time and automate the processes that would be undertaken to demonstrate points that can only be made through visual dynamics.
Animation in ArcGIS
ArcGIS allows different types of animations to be created in ArcMap, ArcScene, and ArcGlobe. You can do the following:
- Navigate through the display.
- Animate the transparency or visibility of layers.
- Move the camera or map view along a path.
- Animate data through time while moving the camera.
- Change the background color, lighting, or vertical exaggeration of a scene.
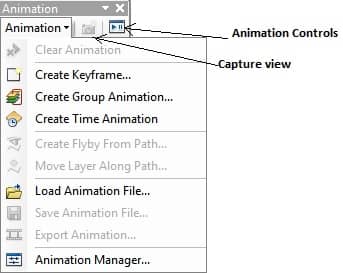
Animation Toolbar
Using the tools on the Animation toolbar, you can create keyframes for animation tracks, save and export animation tracks to video files, and manage and preview your animations.
| Animation toolbar | Description |
| Animation drop-down menu | Displays a menu of all other animation tools. |
| Capture View | Creates an animation by capturing views. |
| Open Animation Controls | Opens the Animation Controls toolbar. |
| Clear Animation | Removes all animation tracks from the document. |
| Create Keyframe | Creates a keyframe for a new or existing track. |
| Create Group Animation | Creates a track that animates the properties of grouped layers (visibility/transparency). |
| Create Time Animation | Creates a track that animates temporal maps. |
| Create Flyby From Path | Creates a track by defining a path along which the camera or the view will travel. |
| Load Animation File | Loads an existing animation file into your document. |
| Save Animation File | Saves an animation file so it can be loaded at a later date. |
| Export Animation | Exports animation files as videos or sequential images. |
| Animation Manager | Edits and fine-tunes animations, modifies properties of keyframes and tracks, and edits the timing of keyframes and tracks while previewing the changes. |
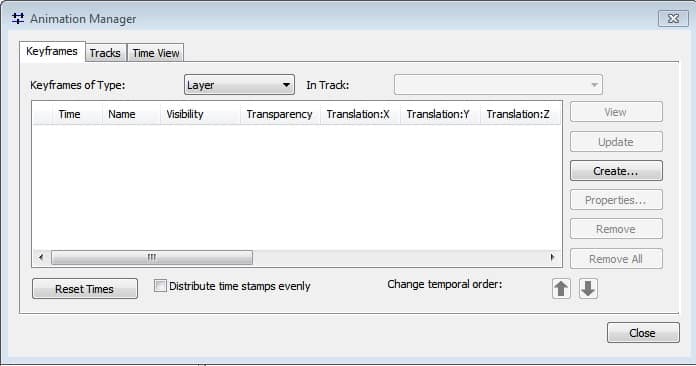
Animation Manager
- The Keyframes tab allows you to modify the keyframe properties.
- The Tracks tab allows you to modify the animation track properties.
- The Time View tab allows you to preview your animation tracks.
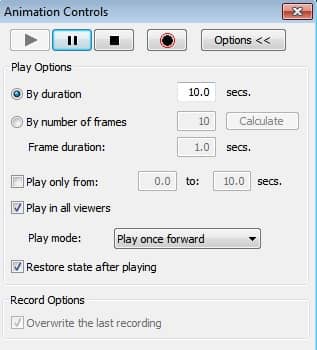
Animation Controls
The Animation Controls helps you to play your animations. You can specify various playing options such as the duration of the animation and lopping options.
Create Animation
Open ArcScene application, and drag your data (3D_map.sxd).
Use the capture view tool on the Animation toolbar to capture the camera view in ArcScene, and save these perspective views as keyframes in camera track.
The resulting track will be an interpolation between the keyframes, making a smooth animation.
The Animation Manager allows you to manage, edit, and preview animation tracks and modify keyframes and their properties. There are three tabs on the Animation Manager;
Scene Animation
A scene animation to reflect changes in ArcScene properties is contained within a scene track. Scene tracks are created generating keyframes using the Create Keyframes dialog box.
Steps:
1. In the Table of contents, right click Scene layers and click Scene Properties to open the Scene Properties dialog box.
[In the scene property set vertical exaggeration, background color, inclination (azimuth, altitude), or contrast].
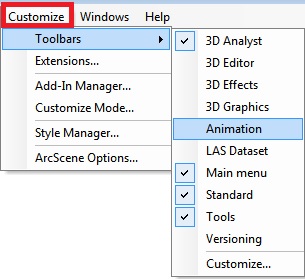
2. Click Customize on the main manu of the application, select Toolbars, the click Animation.
3. Click the Animation drop-down menu and click Create Keyframe.
4. Click the Type drop-down arrow and choose Scene.
5. Click New to create a new track with a default name, or type a name for a new track into the Destination track text box, then click New.
6. Click Create to create the first keyframe.
7. Next Click Close button.
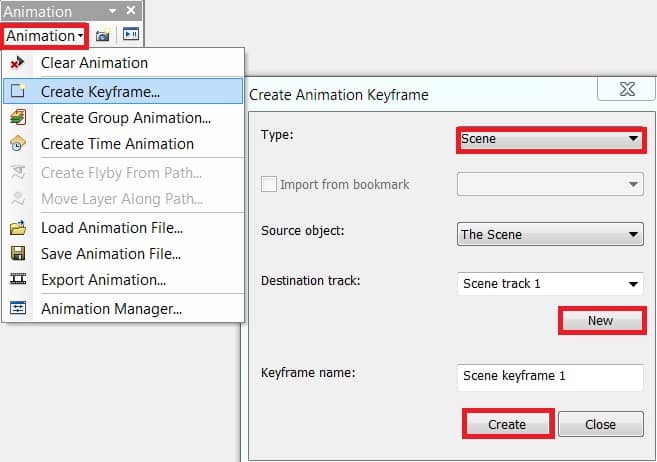
(You can change a scene property on the Scene Properties dialog box, then create a new keyframe repeatedly without closing the Create Animation Keyframe dialog box. You need at least two keyframes to create a track that shows a change).
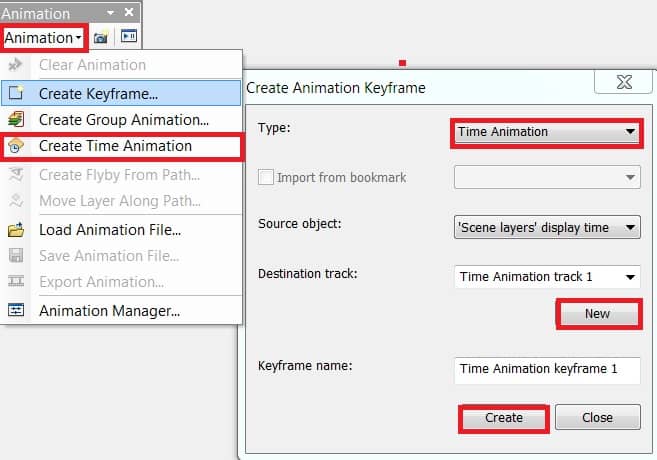
Time Animation
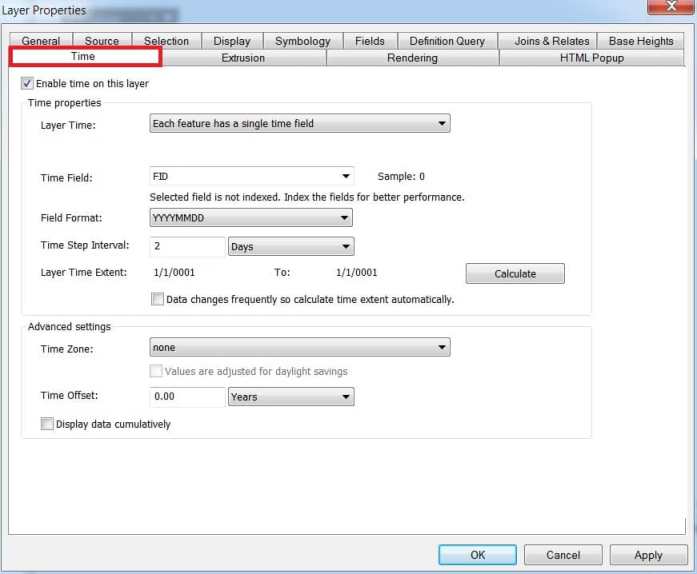
Creating a time animation, you’ll first enable time on the datasets you want to visualize over time. This can be done on the Time tab of the Layer Properties dialog box, then you will create a time animation track.
Steps:
1. Time properties layer can be enabled by simply checking Enable time on this layer on the Time tab of the Layer properties dialog box.
2. Enable time on the data that you want to visualize over time. This can be done on the Time tab of the Layer Properties dialog box.
3. Click the Animation toolbar, click Customize on the main menu of the application, point to Toolbars, then click Animation.
4. Click the Animation drop-down arrow and click Create Time Animation, or click Create Keyframe, the Type drop-down arrow and choose Time Animation. The Create Time Animation dialog box is opened stating that a new time animation track has been created.