Summary: –
Google Earth Pro software tutorial, covering the key features and steps for getting started: Download and Install pro, Interface Overview, Navigation, Exporting and Sharing data.
Google Earth Pro: A Beginner’s Guide to Mapping the World
Google Earth is the world’s most detailed Globe. Download Google Earth Pro for free and enjoy it.
Explore worldwide Satellite imagery and 3D Buildings and Terrain Surface.
Everything you love about Google Earth, new ways for you to explore, learn and share. Zoom in and see what adventures await you.
Zoom to your house or anywhere else, then dive in for a 360° perspective with Street View. Download Google Earth Pro for free and Explore Earth, Sky, Mars, and Moon.
Google Earth Pro on Desktop, Export and Import GIS Data, and go back in time with Historical Imagery.
Google Earth Pro Free Download
Download Google Earth Pro software latest version 7.3.6 on desktop is free, and its available to download for Windows, macOS, Android and Linux.
Install Google Earth Pro
On Windows:
- Double-click the downloaded file.
- To open Google Earth Pro pop-up, click Install button.
On Mac:
- Open “GoogleEarthProMac-Intel.dmg“.
- Open the “Install Google Earth Pro.pkg” file.
- To open Google Earth Pro, open your Applications folder and double-click Google Earth Pro.
[Note: During the installation process, Mac OS X will ask for an administrator password. This information is never shared with Google.]
On Android:
- Click Google Earth app on your device.
- Click Open.
How to Use Google Earth Pro?
You already download and install Google Earth on your computer, open it, and explore now. Scroll to your mouse Zoom in and Zoom out of the Globe and view the beautiful earth’s surface in 3D.
Find any places or area with latitude and longitude and also images.
Use keyboard shortcuts to navigate Google Earth
| Keyboard Action | Shortcut (Windows & Linux) | Shortcut (Mac) |
|---|---|---|
| Move left | Left arrow | Left arrow |
| Move right | Right arrow | Right arrow |
| Move up | Up arrow | Up arrow |
| Move down | Down arrow | Down arrow |
| Rotate clockwise | Shift + Left arrow | Shift + Left arrow |
| Rotate counter-clockwise | Shift + Right arrow | Shift + Right arrow |
| Tilt up | Shift then click and drag down | Shift + Down arrow |
| Tilt down | Shift + Up arrow Shift then click and drag up | Shift + Up arrow |
| See first-person perspective | Ctrl then click and drag | ⌘ then click and drag |
| Zoom in | + | + |
| Zoom out | – | – |
| Zoom plus automatic tilt | Right click and drag up or down | Ctrl then click and drag up or down |
| Stop current motion | Space-bar | Space-bar |
| Reset to north-up view | n | n |
| Reset to top-down tilt | u | u |
| Center Earth | r | r |
| Show/hide Overview window | Ctrl + m | ⌥⇧⌘ + m |
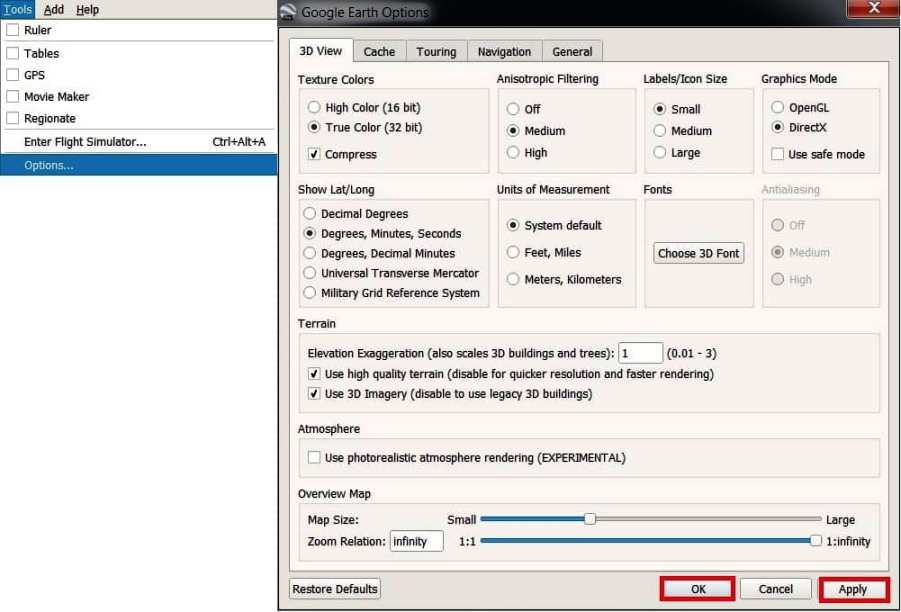
Adjust Terrain Elevation:
- On Windows: Click Tools > Options > 3D View.
- On Mac: Click Google Earth > Preferences > 3D View.
Under ‘Terrain’, enter a number between .01 and 3 for ‘Elevation Exaggeration’. 1.5 shows a natural elevation. Finally click Apply and OK.
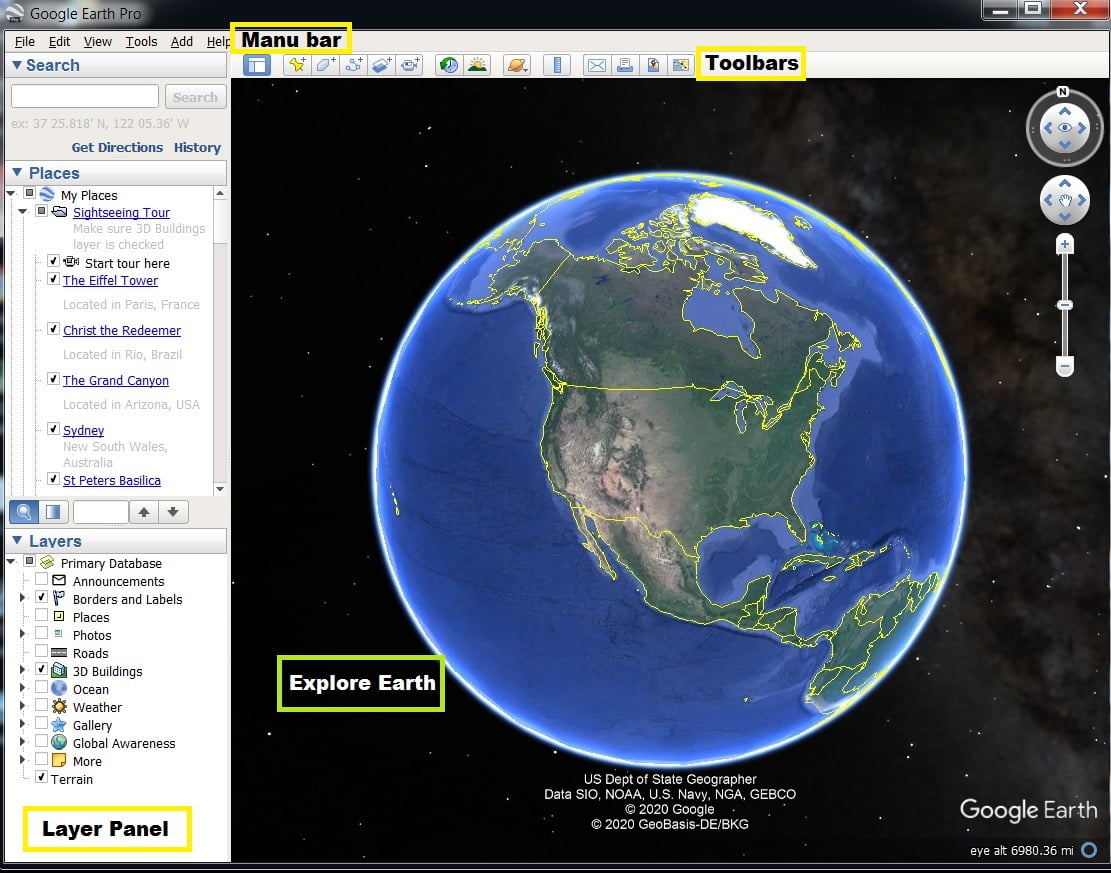
Menu
The menu bar on Google Earth Desktop is a significant feature as it allows users to access several options, including Open, Save, Export, Import, and more.

File:
File menu allow to Open, Save, Import, Export your project. You can also Email your maps and images.
Edit:
Edit menu helps you to Cut, Copy, Paste, Delete, Find your maps or project.
View:
View menu bar allow to Show/ Hide different features option, like; Toolbar, Sidebar, Status bar, and more.
Tools:
Tools menu provide some impotent features, like; Data Tables, GPS, Ruler, etc. You can also Control your 3D view, animations, display settings, as you prefer.
Add:
Add menu helps you to create Folder, Placemark, Path, and Polygon. Also cover a specific area of your map,and save it.
Toolbars
The toolbar at the top of the Google Earth interface gives access to a variety of features provided on Google Earth.

- Show/Hide Sidebar
- Add Place mark
- Add Polygon
- Add Path
- Add Image Overlay
- Record a Tour
- Show historical imagery
- Show Sunlight
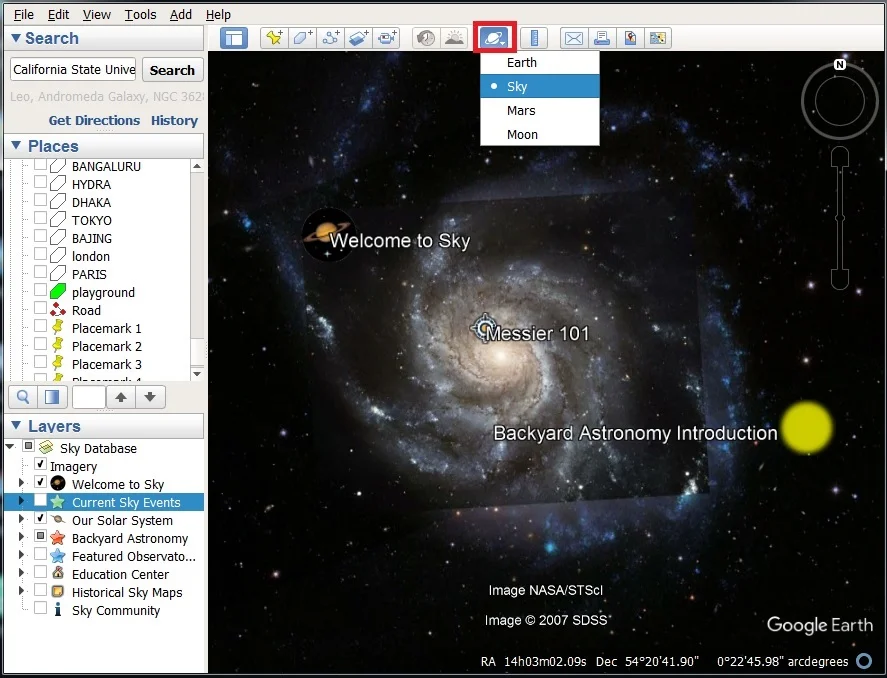
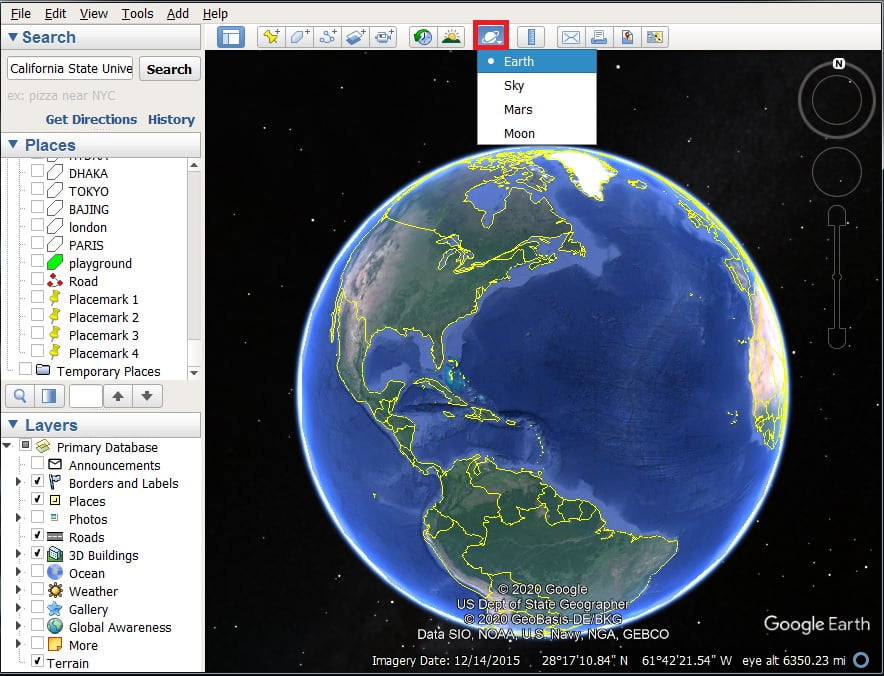
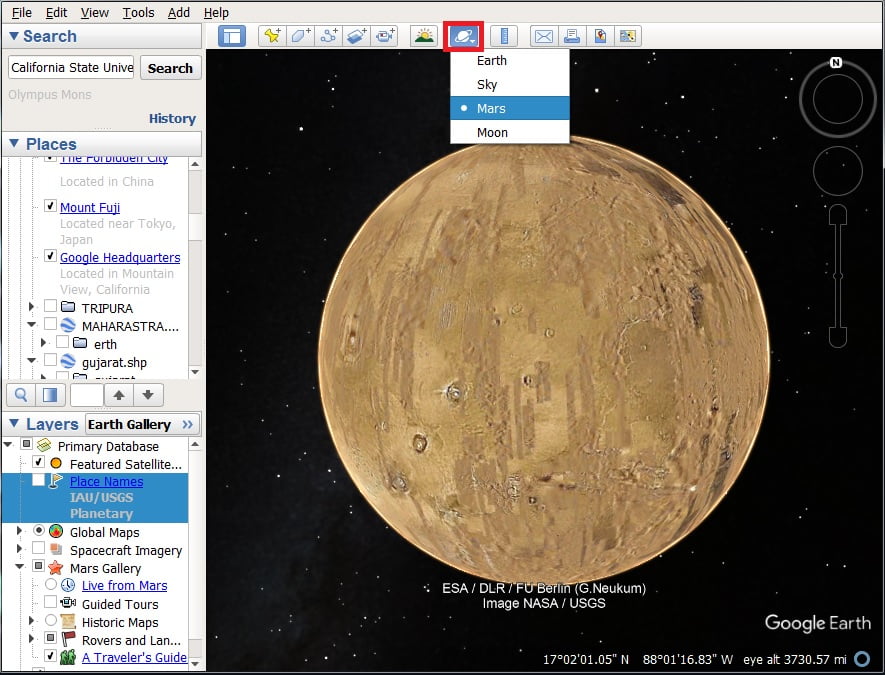
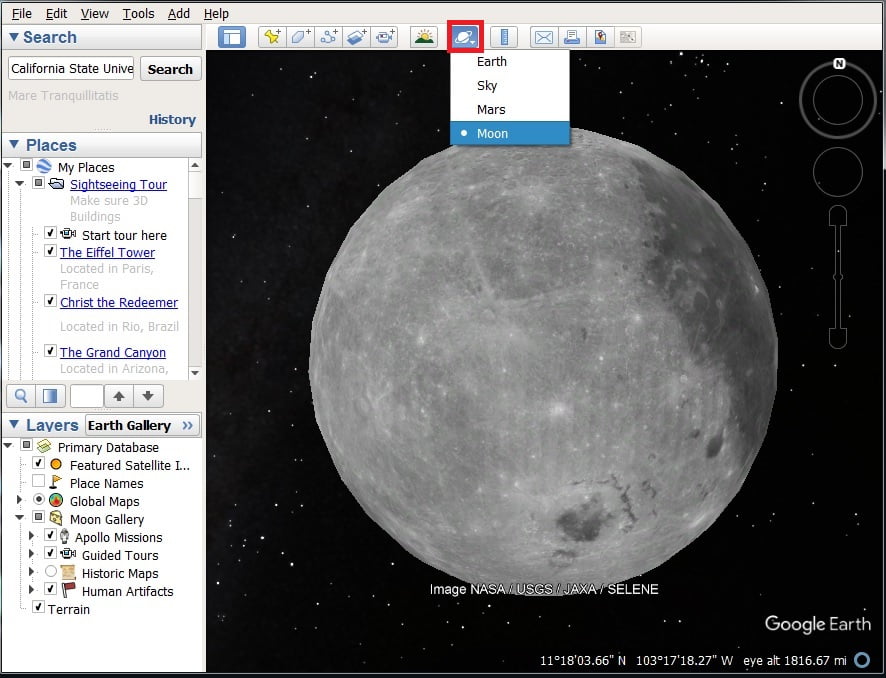
- Explore Earth/Sky/Mars/Moon
- Ruler
- Save Image
- View in Google Maps
- View in Google Earth Web
Sidebar
Google Earth has a sidebar located on the left-hand side of the screen.
Search Bar:
The Search module located at the top, can look up places. It allows users to search for specific locations, landmarks, or addresses and quickly zoom in on them.
Also users can search for points of interest, such as parks, museums, restaurants, and more.
Places:
The Places module, situated in the middle, is where location information is saved and organized.
Layers:
The Layers section at the bottom includes helpful options that can be checked for viewing purposes.
To access Road, Borders, photos, terrain, etc options in Layers Panel, simply check the box.
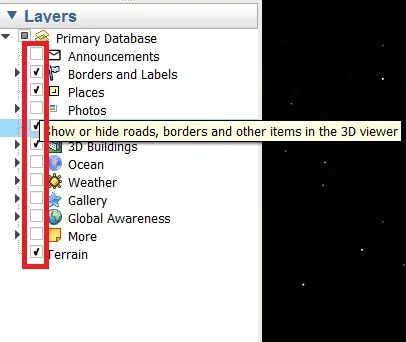
If you can’t see any feature, just check off the Box. It is help you to what you can see or not.
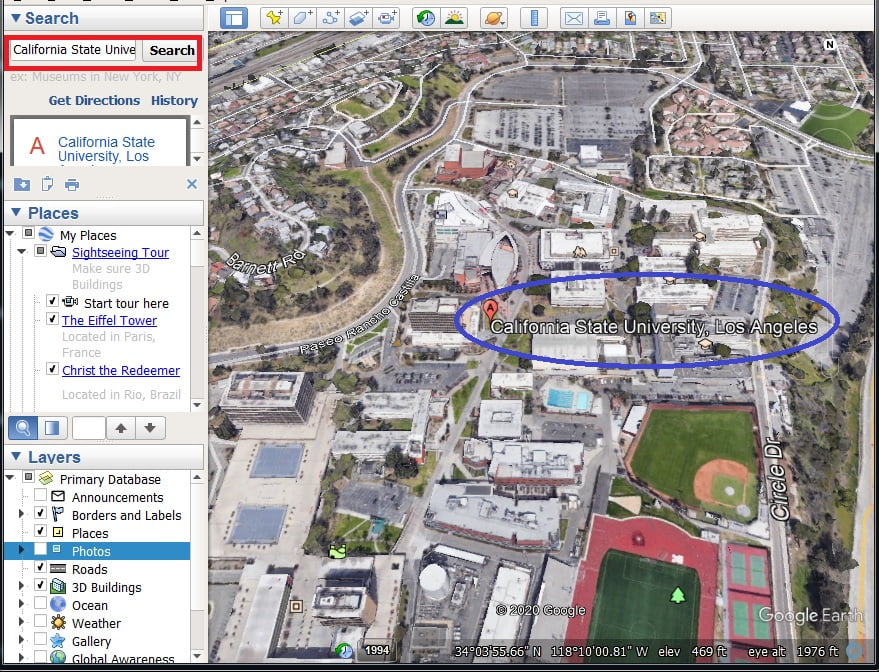
Search Place
Open Google Earth, Search for any place in the Search box, and find your places.
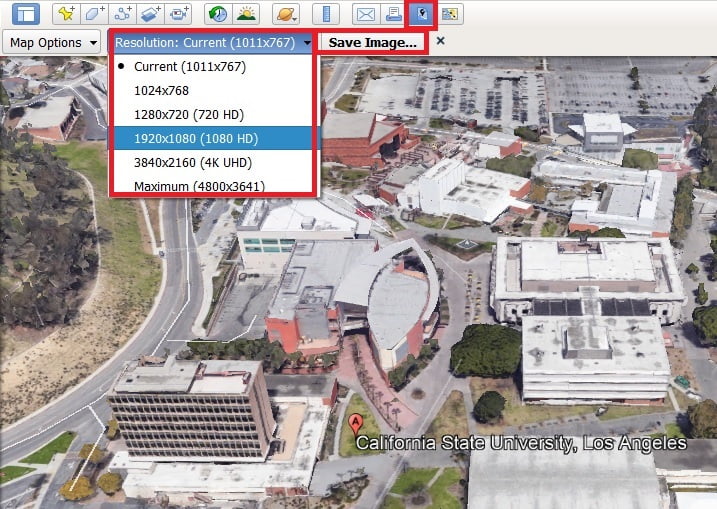
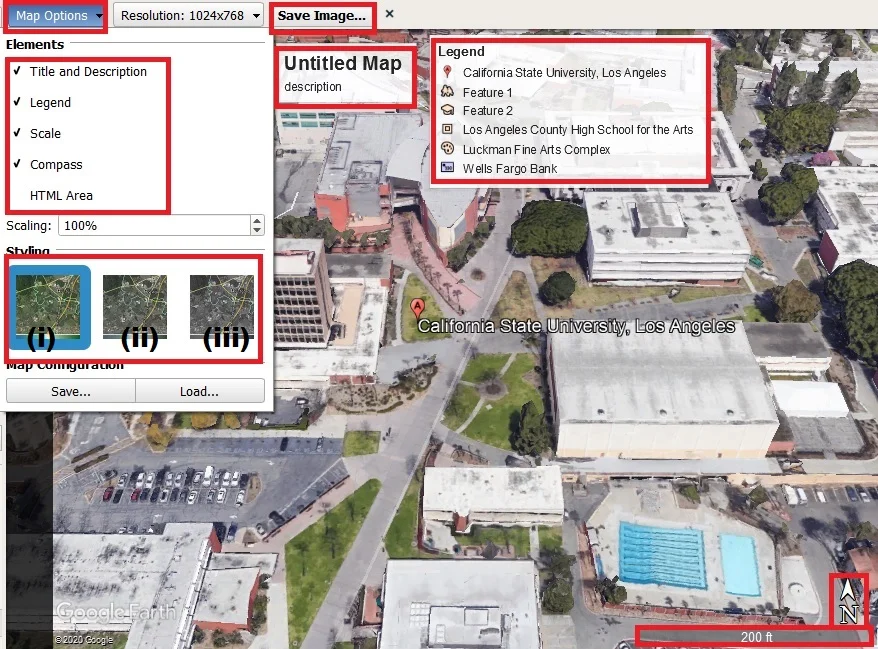
Save image
Save any images in JPEG (.jpg) Format, click Save Image Button > set Resolution. Select high resolution (1080 HD, 4K UHD, etc) then select Save Image > choose your Folder > write Name > OK.
Set Map options > You can set Title, Legend, Scale, Compass (North line), etc. Also setting styling, 3 options are available (i) Full-Color Base Map, (ii) De-saturated Color Base Map, and (iii) Gray scale Base Map.
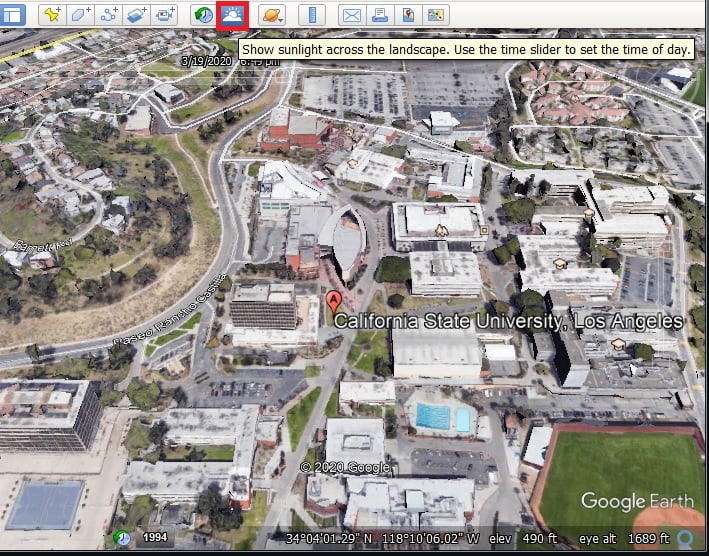
Sunlight Effect Across the Landscape
The sunlight effect on earth’s surface, and you can view Day, evening, and also Night-Time. Use the time slider to set the time of day. Click to show sunlight and view it.

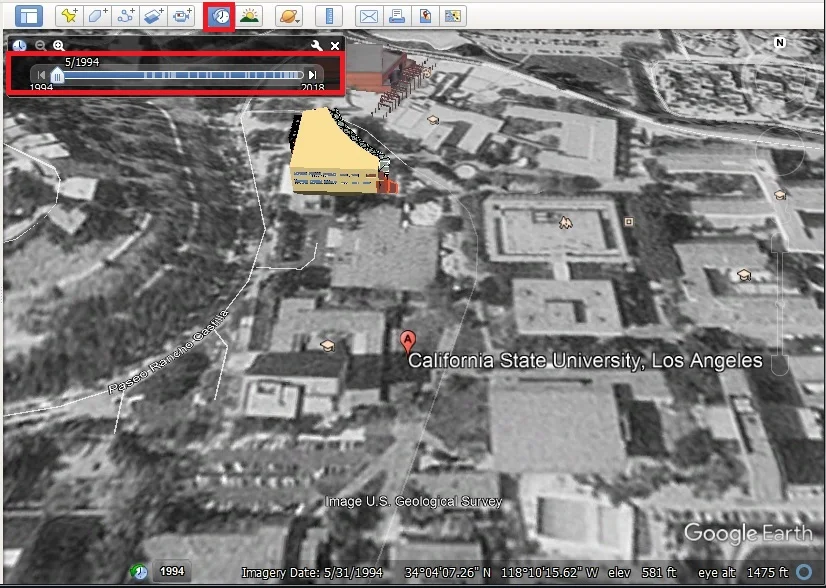
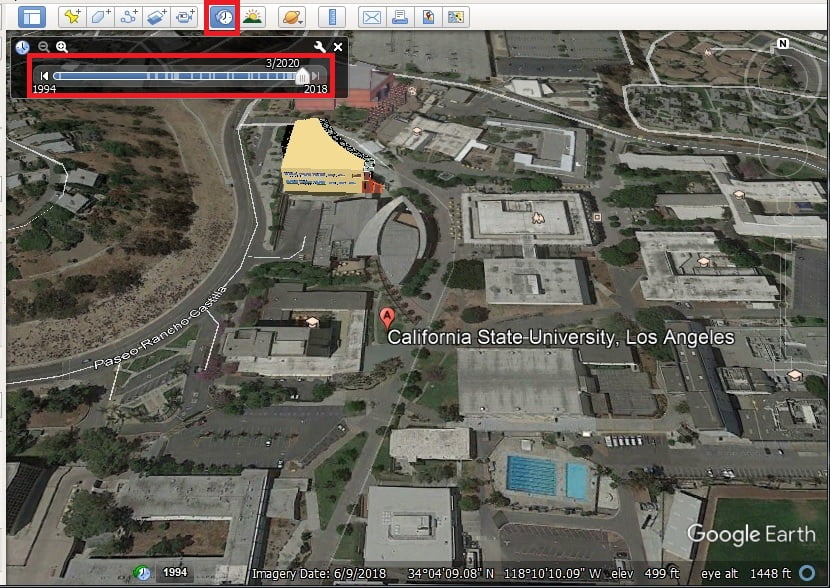
Historical Imagery
Select the show historical imagery button, open slide box > slide left to Right, and automatically change the year and also day and time. You can save different period images (ex.- The California state university, 1994 and 2020).
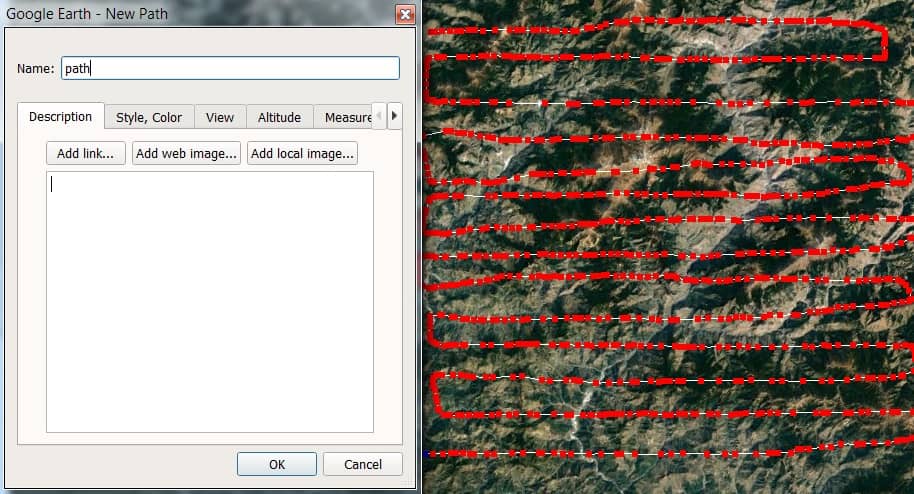
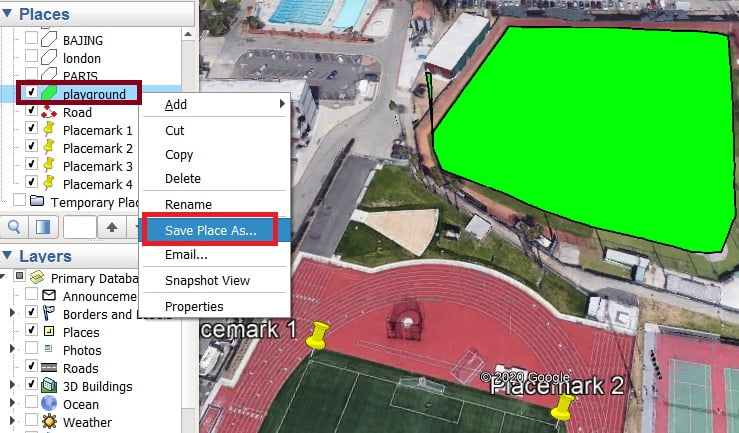
Create Polygon (Area), Path (Line), Placemark (Point)
Create Polygon, Path, or Placemark click to Add menu > drop-down, and select your requirement.
You can create Folder, Polygons, Path, Placemark, etc in Google Earth Surface.

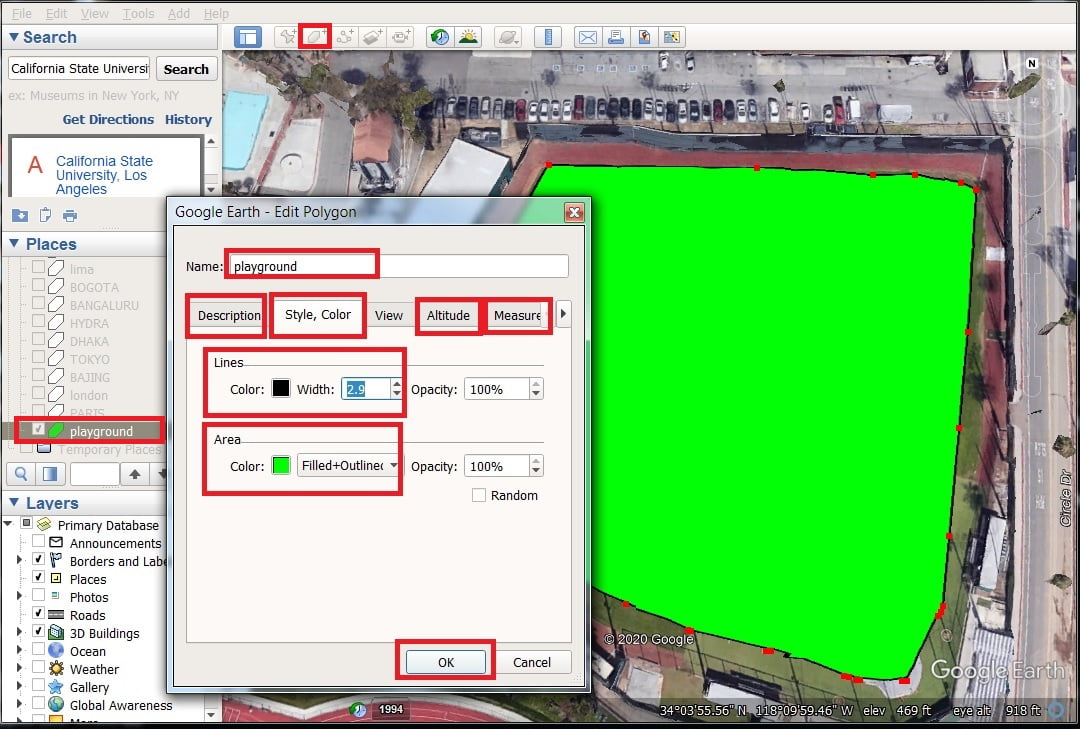
Polygon (Area)
Select a polygon and digitize an area or place. Also, you can change the style, color, and measurement area.
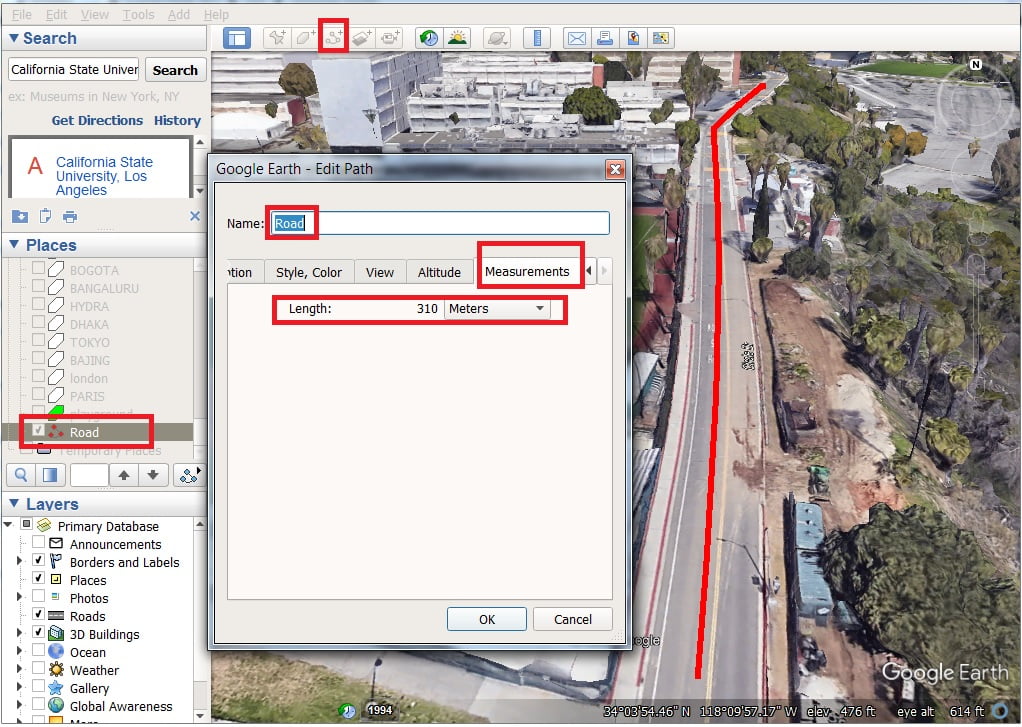
Path (line)
Select Path and Digitized Road, Railway, River, etc. Also, change the style, color, and measurement of road length.
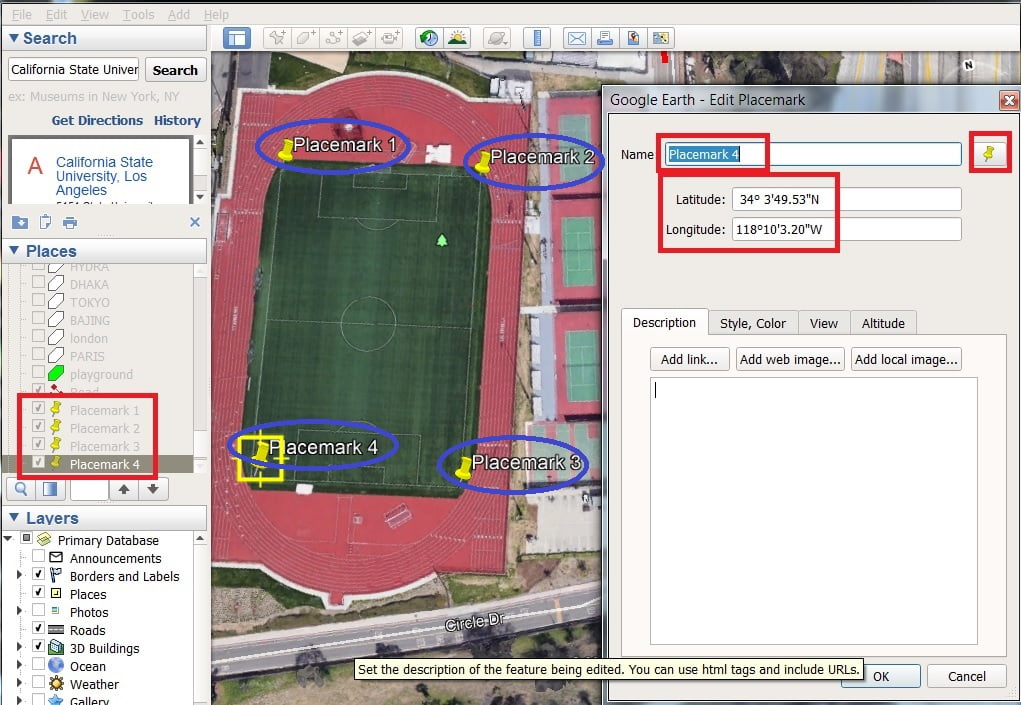
Placemark (point)
Choose a place mark and Digitized any place, like School, Hospital, etc. Show Latitude and Longitude values.
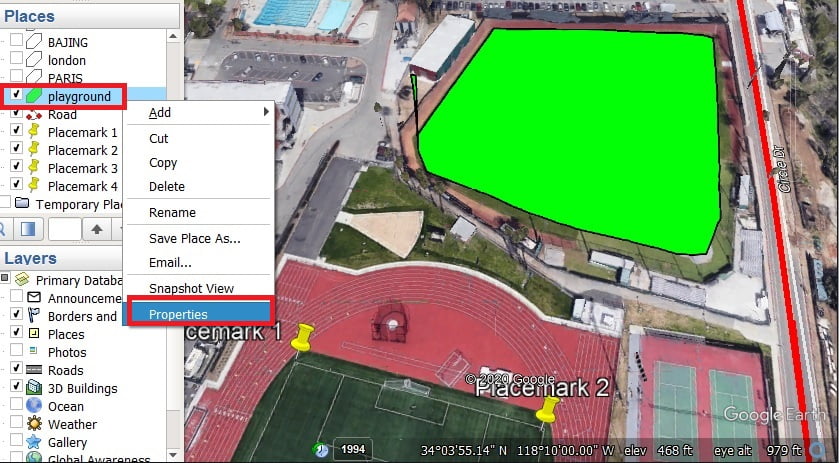
Edit any features (polygon, path, or place mark), select feature into Places Panel > Right Click > Properties. Now edit, change color, symbol, style, etc.
KML & KMZ File
Complete edit, now time to save as or export the data.
Two Format available to save as option (i) KML (Keyhole Markup Language) and (ii) KMZ (Keyhole Markup language Zipped). These two formats use GIS Software’s.
Google Earth explores not only Earth but view to Sky, Mars, and Moon.
Learn more Google Earth Pro Tutorials