Image Classification in ArcGIS
In this tutorial learn, supervised and unsupervised image classification example using ArcGIS Software.
What is Image Classification?
Image classification is the process of sorting pixels into a finite number of individual classes, or categories of data, based on their data file values. If a pixel satisfies a certain set of criteria, the pixel is assigned to the class that corresponds to that criteria. This process is also referred to as image segmentation.
Depending on the type of information you want to extract from the original data, classes may be associated with known features on the ground or may simply represent areas that look different to the computer. An example of a classified image is a land cover map, showing vegetation, bare land, cultivation, water bodies, urban, and more.
Image classification refers to the task of extracting information classes from a multiband raster image. The resulting raster from image classification can be used to create thematic maps. There are two types of classification:
Classification Process
The classification process is a multi-step workflow, therefore, the Image Classification toolbar has been developed to provided an integrated environment to perform classifications with the tools.
The ArcGIS Spatial Analyst extension, there is a full suite of tools in the Multivariate toolset to perform supervised and unsupervised classification.
Make sure you are enable Spatial Analyst extension in ArcMap, otherwise you can’t perform image classification.
To Enable or Disable ArcGIS extensions, Click Customize on the Main toolbar and select Extensions.
Perform Supervised classification
In the following example, the Image Classification toolbar was used to classify a Landsat TM satellite image (Sundarbans).
Create training samples
In supervised classification, training samples are used to identify classes and calculate their signatures.
Steps:
1. Open Image Classification toolbar,Click Customize on the Main toolbar and select Image Classification.

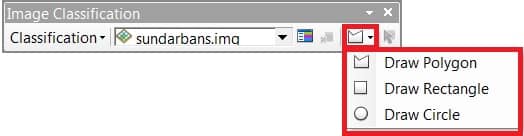
2. Click the draw button, select one of the training sample drawing tools; polygon, rectangle, circle on the Image Classification toolbar and draw on the input image layer.
3. In the satellite image, identify an area that belongs to a known class. Use the drawing tool to define a any particular feature (ex.-river).
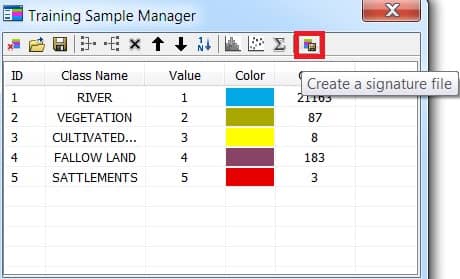
4. Once you finish drawing a training sample, now open Training Sample Manager window, a new class is created in Training Sample Manager with a default name, value, and color.

5. In the manager, you can change the class name, value, and color for the class.
6. Repeat the same process to create few more training samples to represent the rest of the classes in the image.
Editing classes
You can rename or renumber a class, change the display color, split a class, delete classes, save and load training samples, and so forth.
Merge training class
On the Training Sample Manager dialog box, choose two or more training class, that you want to merge.
Select training class, then click the Merge button.

Create signature file
A signature file (.sig) can be created using the Create Signature File tool.
Click the Create Signature File button, then choose your destination folder, and click Save.
Applying classification
Finally classify your image.
Steps:
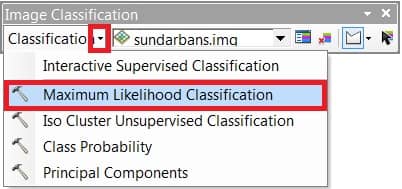
1. On the Image Classification toolbar, click Classification > Maximum Likelihood Classification to open the Maximum Likelihood Classification tool.
2. In the dialog box, specify values for the three required parameters—Input raster bands, Input signature file, and Output classified raster. Accept the default values for other parameters.
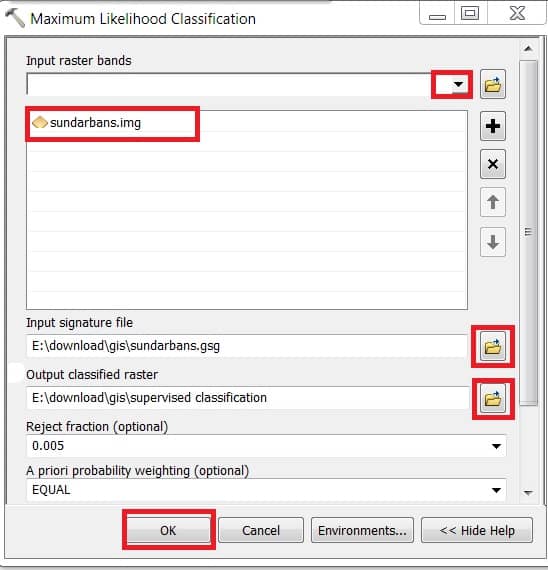
3. Click OK to run the Maximum Likelihood Classification.
Perform Unsupervised classification
For unsupervised classification using the Image Classification toolbar, the signature file is created by running the Iso Cluster Unsupervised Classification tool.
The following are the steps to perform the Iso Cluster Unsupervised Classification tool:
Steps:
1. On the Image Classification toolbar, click Classification > Iso Cluster Unsupervised Classification.
2. The Iso Cluster Unsupervised Classification tool is opened, specify values for Input raster bands, Number of classes, and Output classified raster. You may accept default values for other parameters.
3. Click OK to run the Iso Cluster Unsupervised Classification.