Feature Class in ArcGIS Pro
Creating a Feature class using ArcGIS Pro, you choose whether to create features are; polygons, lines, points, annotation, multipoint, multipatch, or dimension.
Create a Feature Class in a Geodatabase
Before you can work in ArcMap, it’s almost the same to Create Feature class, Add Feature everything.
Create an feature class in a Geodatabase.
[You’ll create a new project that already automatically creates a Geodatabase (.gdb) file.]
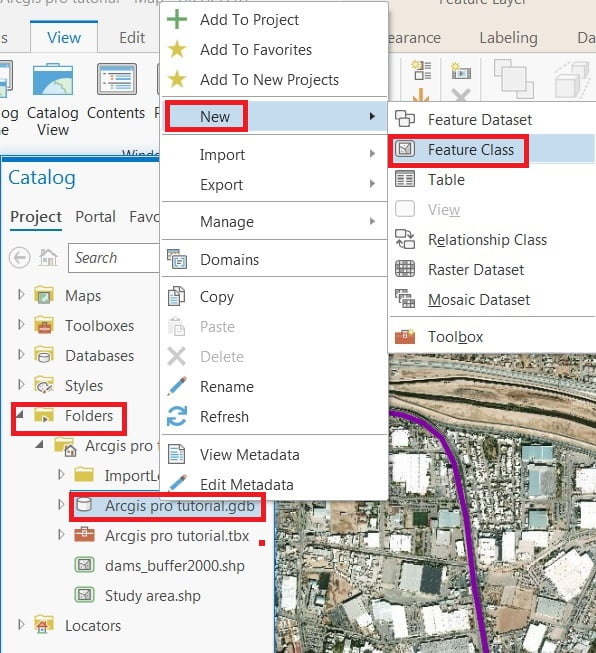
1. In the Catalog pane, right-click the geodatabase in which you want to create a feature class.
2. Navigate your Folder, right-click .gdb file (Arcgis pro tutorial.gdb) > choose New select > Feature class.
3. The create feature class window appears, type a name for the feature class in the Name text box, and also alias in the Alias text box.

4. Choose the type of features that will be stored in this feature class from the Feature Class Type drop-down list.
5. If your new feature class will require m- or z-values, check the appropriate check boxes under Geometric Properties.
6. Click Next button.
7. To add a field to the feature class, click the final row where it says Click here to add a new field. A new row will be added to the list of fields. In the Field Name column, type a name.
8. Click the drop-down menu in the Data Type column and choose a data type for the new field.
If you set Add field, Spatial reference, Tolerance, etc, finally click Next button and Finish.
Create a Feature class in a Feature Dataset
All feature classes in a Feature dataset must use the same spatial reference, and coordinate system which is defined when the feature dataset is created.
1. In the Catalog pane, right-click the feature dataset in which you want to create a feature class.
2. Select New > Feature Class. The Create Feature Class window opens.
3. The create feature class window appears, type a name for the feature class in the Name text box, and also alias in the Alias text box.
4. Choose the type of features that will be stored in this feature class from the Feature Class Type drop-down list.
5. Click Next button to complete this task.