ArcGIS Excel / Office
Introduction
ArcGIS for Office is now ArcGIS for Excel. Make maps in Microsoft Excel and further the power of ArcGIS Online and ArcGIS Enterprise. It performs to transform your graphs and charts into interactive maps directly in Microsoft Excel to see data from another perspective then, easily share your map across your organization.
Key Features:
- Mapping and Visualization
- Geospatial Analysis
- Spatial Statistics
- Integration with ArcGIS Online
How it Works?
- Visit Microsoft AppSource for access
- Map location data
- Enrich spreadsheet data
- Share your map
ArcGIS Office/ Excel Download
Download the ArcGIS Excel, users need to install the ArcGIS Office add-in, as well as the provided additional resource files that need to be hosted on their Enterprise portal.
Before you download, make sure you have a Microsoft account, otherwise you can’t access this.
Click the “Get it now” button to complete the download process.

ArcGIS Office Tutorial
Steps:
1. First Download the Excel spreadsheet data.
2. Open Microsoft Excel.
[Note:-This add-in works in: Excel 2016 or later on Mac, Excel 2016 or later on Windows, Excel on the web. If you don’t have the above, try using Office Online.]
3. The page for Microsoft Excel Online appears.
[Excel will be saved to your OneDrive]
4. Drag your downloaded data into the Microsoft Excel Online page to upload the file.
[When the upload is complete, the spreadsheet automatically opens.]
5. The spreadsheet contains two tabs—one for each worksheet. The salons tab has information about the salons, and the new customers tab has all the contact information that you collected at the Women’s Show.
6. On the Excel ribbon, click the ArcGIS tab to display the ArcGIS tools.

[If you don’t see the ArcGIS tab, download and install ArcGIS for Excel.]
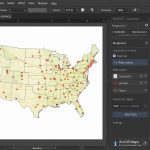
7. On the Excel ribbon, click Show Map.
8. Now the pop-up message ‘Welcome to ArcGIS for Excel’ pane appears, click Get Started to continue the process.
9. The Excel pane appears. In the ArcGIS for Excel pane, click Sign In to your ArcGIS organizational account.
10. A blank map and layer list appears in the Excel pane.
11. In the coach mark window, click Got it.
12. You have not added any layers yet, so the list is empty. At the bottom of the Layers pane, the Add from Excel and Add from ArcGIS buttons allow you to add data to the map.
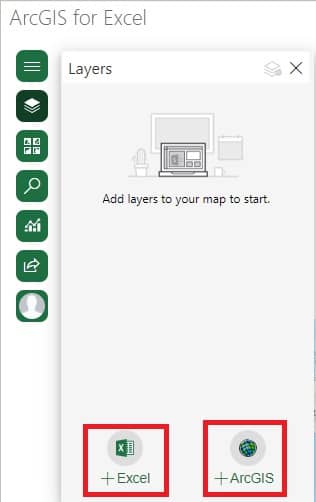
13. In the Layers pane, click Add from Excel.
14. The Add from Excel pane appears, in the Dataset-Table drop-down menu, choose Select a cell range.
15. In the Excel pane, add from Excel pane, confirm that the First row contains headers box is checked.
16. For Location types, choose Address.
17. Under Location types, for Country, choose Canada.
18. Finally click Add to map button.