Export Attribute Table to Excel in ArcGIS Pro
Exporting an attribute table from ArcGIS Pro to Microsoft Excel is a common workflow. The attribute table must be modified externally without altering original records.
What is Attribute Table
The attribute table display information on features of a selected layer. Each row represents a feature and each column represents one feature attribute.. Features in the table can be searched, selected, moved or even edited.
A attribute database or tabular file containing information about a set of geographic features. In raster datasets, each row of an attribute table corresponds to a certain zone of cells having the same value.
In a GIS, attribute tables are often joined or related to spatial data layers, and the attribute values they contain can be used to find, query, and symbolize features or raster cells.
Export Attribute Table to Excel file
Export the attribute table using the Table to Excel tool.
Steps:
1. Open your ArcGIS Pro project, on the top ribbon, click the Analysis tab > Tools.
2. In the Geoprocessing pane, search for Table To Excel (Conversion Tools), and click it.
3. The Table To Excel window opens. In the Table To Excel window, click Parameters.
4. Click the drop-down menu of Input Table or Browse your folder, and select the feature layer with the desired attribute table.
5. In the Output Excel File (.xls or .xlsx) section, click Browse folder icon.
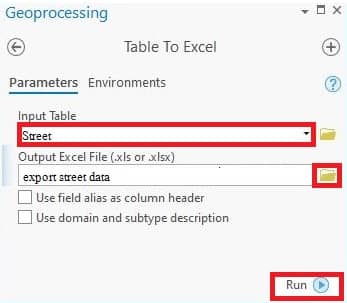
6. In the Output Excel File (.xls or .xlsx) window, specify a folder location for the Microsoft Excel file. In the Name section, specify a name for the Microsoft Excel file.
7. Click the All supported drop-down menu, select a format (.xls or .xlsx) for the Microsoft Excel file, and click Save.

8. In the Table To Excel tool, click Run.
9. Navigate to the specified folder location in Windows. The attribute table is exported and can be opened in the Microsoft Excel Worksheet type.
Export Attribute Table to CSV file
Steps:
1. In the Contents pane, right-click the desired feature layer, and select Data > Export Table.
2. On the Export Table window, click the drop-down menu of Input Rows or Browse folder icon, and select a desired feature layer.
3. Under Output Location, click Browse folder icon, select the desired output location, and click OK.
4. Under Output Name, specify a name with the .csv file extension for the exported table, and click OK.
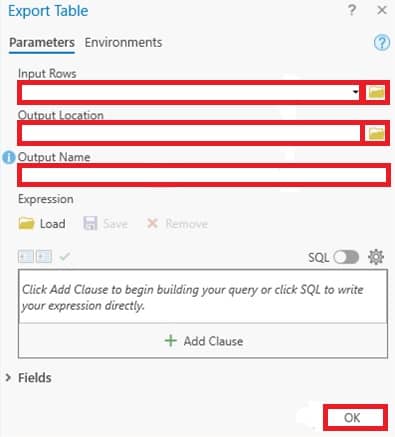
5. The attribute table is exported and can be opened in the Excel Comma Separated Value(.csv) File type.