ArcGIS Engine
What is the ArcGIS Engine?
ArcGIS Engine is a comprehensive set of core software components, tools, and resources packaged together for developers to build custom GIS and mapping applications.
It is a new component framework in the ESRI ArcGIS product family, created to embed spatial functionality.
ArcGIS Engine is an application can be deployed within the Engine framework, or developers can embed GIS functionality in other custom or commercial applications such as Microsoft Word or Excel.
Core Functionality
- Map Creation
- Map Interaction
- Map Analysis
- Data Creation
- Developer Controls
Features
- Base services—Core GIS ArcObjects required for almost any GIS application.
- Data access—Engine provides access to a wide variety of raster and vector formats.
- Map presentation—ArcObjects for map creation and display with symbology, labeling, and thematic mapping.
- Developer components—High-level user interface controls for rapid application development.
- Extensions—Engine Runtime is deployable with the standard functionality.
Extensions
- Geodatabase Update extension—ArcGIS Engine Runtime adds the ability to create and update a multiuser geodatabase managed with ArcSDE or a file geodatabase. Create geodatabase behaviors, such as versions, linear networks, topologies, subtypes, and geometric networks.
- Spatial extension—provides a powerful set of functions that allow applications to create, query, and analyze cell-based raster data. This extension supports include the calculation of slope, aspect, and contours against digital elevation models (DEMs).
- 3D extension—enables the visualization of data in three dimensions. Scene-Control and Globe-Control provide the interface for viewing multiple layers of 3D and global data for visualizing data, creating surfaces, and analyzing surfaces.
- Network extension—adding the capability of routing, service area analysis, and creating and managing network datasets.
- Maplex extension—allows developers to leverage the Maplex label placement engine for high-quality text and label placement.
- Tracking extension—supports the display, analysis, and manipulation of temporal data within an ArcGIS Engine solution.
- Schematics extension—provides the developer components and ArcObjects to manage schematic data and processes.
- Data Interoperability extension—eliminates barriers for data sharing by providing direct data access, transformation, and export capabilities via geoprocessing tools.
Installing ArcGIS Engine
Installing ArcGIS Engine Runtime for Windows
Installation of the runtime can be handled in either of two ways:
- End user runs the Engine Runtime setup directly from the CD.
- The Engine Runtime setup within your own application’s installation program.
End user Installs
End user installs the Engine directly from the CD ESRI provided, that you created by copying the contents of the Engine CD image.
1. Confirm that any currently installed ArcGIS products are the same version as the Engine Runtime setup to be installed. To check if any of these products are installed on the machine and to verify the version number, do the following:
- Click Start, Control Panel, and open the Add/Remove Programs dialog box.
- If Engine Runtime is listed in the programs list, it is installed on the machine. Confirm that Engine Runtime is the correct version. Click the support information link to determine the product version number. Close the window and proceed to the installation steps for your application name.
If no ArcGIS products are shown in the programs list, follow the Step 2
2. Launch the Engine Runtime installation program by navigating to the CD drive location and the \Windows subfolder, then double-click the setup.exe file.
3. Click Next if all Windows applications are closed.
4. Review and accept the license agreement and click Next to proceed with the installation.
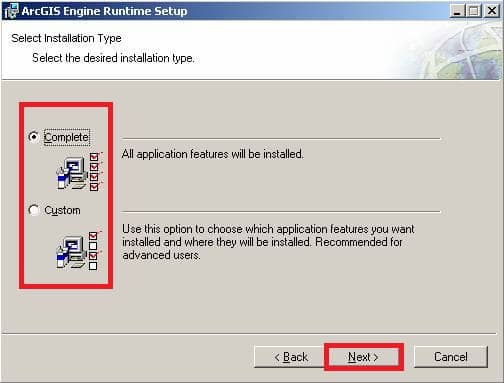
5. Choose the installation type: Complete or Custom, and click Next to continue.
6. Follow any further instructions of the Engine Runtime installation until it indicates that the installation is complete.
Service pack Installing
1. Check the required Engine Runtime service pack has been installed to the target machine by doing the following:
- Click Start, then Run.
- In the Run dialog box, type Regedit to open the Registry Editor.
- Check for the SPNumber registry key under the following registry hive: HKEY_LOCAL_MACHINE\SOFTWARE\ESRI\. The SPNumber value reflects the service pack number installed.
2. Install the service pack using the following command line:
msiexec.exe /p \ArcGIS.msp REINSTALL=ALL REINSTALLMODE=omus
ArcGIS Engine Tutorial
Download and extract the ArcGIS Engine and ArcObjects packages.
1. After the installation, open the ArcGIS Administrator wizard.
2. Choose the desired Single Use product.
- Choose the ArcGIS Engine (Single Use)
- Choose the ArcGIS Engine and ArcGIS Engine Developer Kit (Single Use).
3. Click Authorize Now.
(Use My Esri to complete the authorization process)
4. Select the default option. I have installed my software and need to authorize it.
5. Select Authorize with Esri now using the Internet.
(If using a provisioning file, choose the option. I have received an authorization file from Esri and browse to the file.)
6. Enter your personal information where applicable.
7. Enter your core product authorization number (ESUxxxxxxxxx). Review the View Authorizations page.
8. Enter the authorization numbers for extensions.
(For extensions not listed, manually type the extension name and the authorization number.)
9. After the authorization process is complete, click Finish.
10. Click OK to close the ArcGIS Administrator wizard.
Now your software is ready for use.